You’ve created something amazing. You’ve published on GitHub. People are downloading, using, forking, and contributing. The community is thrilled. But are you ready for the oncoming glut of Pull Requests?
Continuous Integration/Continuous Delivery (“CI/CD”), two terms so frequently mentioned together they’ve been fused into one concept, refers to the automation of such repetitive tasks as testing, building, and deploying software. Over time, it has become an invaluable tool in maintaining a productive and functional team.
Not a Travis CI user yet? Sign up for a free account!
A CI process is a process in which software is developed by multiple sources and is automatically integrated via an established procedure. The flow might go something like this:
If all tests pass, it means the code can be safely (well, safely in the areas the tests cover) be merged into the main branch.
A CD process is a process that usually follows the merge process. It takes the newly merged version and usually does the following:
Many tools can help you create a CI/CD process. One shiny and easy to use tool is Travis CI. In the sections that follow, I’ll show you step-by-step how to integrate an existing project with Travis CI and set up a simple CI/CD process.
The project is a web component library that currently only features a modal window. Here’s the GitHub link.
It currently has a test and build flow (via npm run test:prod and npm run build). It has a demo that is deployed manually to Firebase Hosting. You can see the demo here.
Most CI tools integrate seamlessly with Git services — especially GitHub. Go to travis-ci.com and sign up. I suggest logging in with your GitHub account — it’ll make things easier at later stages.
Inside Travis CI, there is a search bar on the left side of the screen; Click the + sign below it.

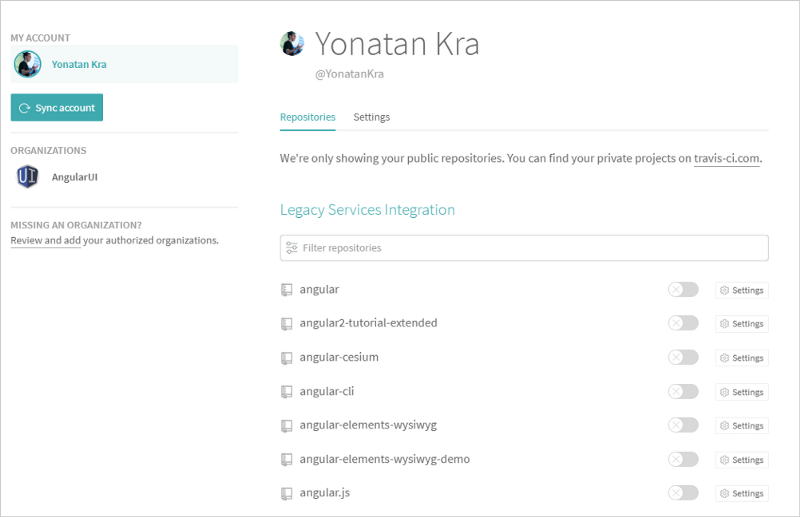
If you connected your GitHub account, you should see a list of your existing repositories, from which you can add:

A list of your projects. Well… mine. I guess React users would leave this article now 😉
Search for the relevant project (in my case, web-components-ui-elements) and click the nearby switch.

Red is the switch, blue is the settings 🙂
After it is enabled, click on the settings button (indicated by a blue arrow above). Now you should see several settings. I encourage you to read about each option in the Travis CI documentation and choose the setup that suits you. We will use the default settings for this tutorial.
Now that the backend is setup, let’s connect the project from the code end to Travis CI.
Most CI tools expect a configuration file to exist in the project. Travis CI expects a .travis.yml file to exist in the project root.
Let’s see how we build a file in Travis CI:
language: node_js
node_js:
  - "8"
script:
  - echo 'Build starts!!'
  - echo 'Installing Deps!'
  - yarn
  - echo 'Testing!'
  - npm run test:prod
Let’s go over the parts:
As mentioned above, the CI process mainly makes sure we didn’t break anything and that we are ready to merge/integrate. So this phase will include the following process: Clone -> yarn/npm install -> test
We also want to speed up our builds, so we‘ll tell Travis to cache our npm or Yarn folder (or any other package manager you are using — Travis supports many).
We’re using Yarn; let’s tell Travis to cache the Yarn folder:
language: node_js
node_js:
  - "8"
cache: yarn
script:
  - echo 'Build starts!!'
  - echo 'Installing Deps!'
  - yarn
  - echo 'Testing!'
  - npm run test:prod
You can read more about caching here.
The moment you push a change, Travis will trigger the build process.

Process started — Yarn, cache and tests are now running.
Click here to see the results.
On the results page, you can see the summary (the process passed or failed) at the top. Below, you can view the job’s log and see our echos and the whole output of the CI process.
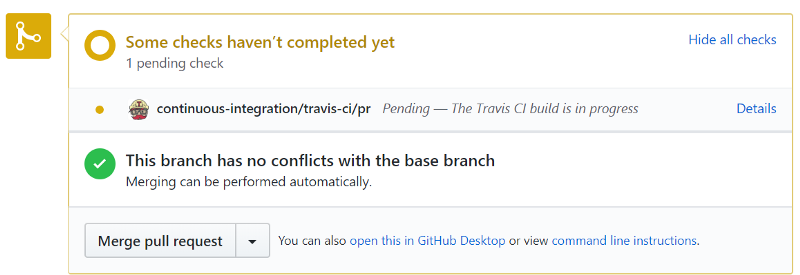
In this case, I pushed to a pull request. On GitHub, you can see the results in the Pull Request (“PR”) page like this:

Tests are running.
Once the process passes, you will see the change on GitHub:

Yahoo! We can merge to master now!
Testing is just one step in the CI process. You can add more lines to the script stage, including processes like linting, E2E tests, performance tests and whatever metric you can think of to test new code before you merge it to the main code base.
So far, we’ve seen how to use CI to feel safer before merging changes into our main branch. This is CI’s role.
The process of uploading the new and wonderful feature that was just merged is still manual. We need to manually type into our local machine’s console to deploy. It’s time to automate the process.
The CD process here will be pretty simple — just upload the dist to Firebase.
If you’ve followed so far, you might be able to deduce that we’ll just use the same command line directives we use on our own computer — only we’ll tell the remote VM to do it for us:
install:
  - npm install -g firebase-tools
after_success:
  - firebase deploy --token "$FIREBASE_TOKEN"
These lines tell Travis to install the firebase-tools globally and, after a successful build, deploy to Firebase.
Notice I’ve added two more stages to the process: 1) install and 2) after_success. It’s not mandatory to use them; you could add more script lines instead.
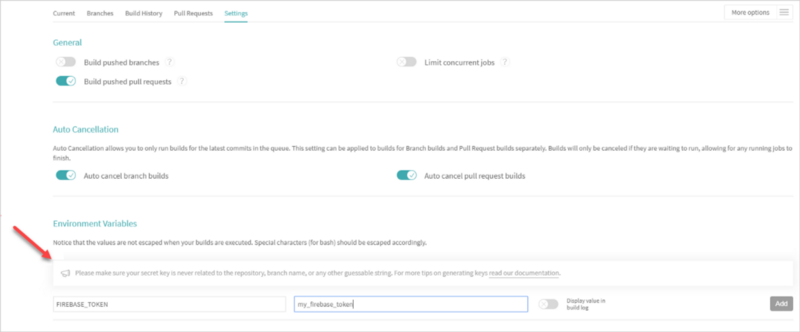
Notice the $FIREBASE_TOKEN in the yml code above. This is an environment variable. We can obtain the token using firebase login:ci. This command opens a browser that leads you through the process of creating a token.
We then setup the token as an environment variable in the project’s settings we saw before in travis-ci:

Red arrow marks the spot.
This way you can add any environment variable you want. There’s also a way to define environment variables via the yml file, but, for simplicity’s sake, I’ll skip it. If you’re interested, read more here.
Note that I’ve setup Firebase hosting for the project (you can see the firebase.json file here).
The full yml file would be:
language: node_js
node_js:
  - "8"
cache: yarn
script:
  - echo 'Build starts!!'
  - echo 'Installing Deps!'
  - yarn
  - echo 'Testing!'
  - yarn test:prod
install:
  - npm install -g firebase-tools
after_success:
  - yarn build
  - firebase deploy --token "$FIREBASE_TOKEN"
Now, every time we push a branch that passes the tests, we get the new version in production.
If you want to use a built-in deployment option, make sure to check out all of[ the deployment options Travis offers here.
You got me there… our process now does the following:
This raises a problem: While we deploy the branch to production, our master remains the same. This could cause inconsistencies in many cases.
What I’d like to do is catch a merge into master, and then deploy. So step 5 would become the following:
A pipeline in Travis is called a “job.” It practically translates into a process that runs in a Virtual Machine (“VM”). Travis allows us to create several jobs (i.e., several VM’s that can run in parallel) and define certain stages for each job. This helps us to arrange our processes and use conditionals to easily manipulate them.
Here’s the resulting code:
language: node_js
node_js:
  - "8"
cache: yarn
jobs:
  include:
    - stage: test
      script:
        - echo 'Deploy!!'
        - echo 'Installing Deps!'
        - yarn
        - echo 'Testing!'
        - yarn test:prod
    - stage: deploy
      script:
        - npm install -g firebase-tools
        - firebase deploy --token "$FIREBASE_TOKEN"
A bit bigger, but the idea remains the same.
First, I create the jobs property which describes the two stages we’ve seen before:
At this point, for every push to any branch, the whole process will run. We’d like the tests to run for PRs and the deploy for push to master (e.g., merge).
Travis allows us to easily add conditioning to every process, job, or stage. Let’s add some conditions:
language: node_js
node_js:
  - "8"
cache: yarn
jobs:
  include:
    - stage: test
      script:
        - echo 'Deploy!!'
        - echo 'Installing Deps!'
        - yarn
        - echo 'Testing!'
        - yarn test:prod
    - stage: deploy
      script:
        - npm install -g firebase-tools
        - yarn build
        - firebase deploy --token "$FIREBASE_TOKEN"
stages:
  - name: test
    # require the type to be a PR
    if: type = pull_request
  - name: deploy
    # require the type to be push to master
    if: type = push AND branch = master
The new property shown in the code above — stages — helps us to easily define conditions to run each stage of our pipeline. I define the test to run if the type of trigger is a PR and the deploy if the trigger was a push to master.
If you just create a new branch and push to GitHub, nothing will happen on Travis, because it doesn’t apply to any condition. You can see what happens with those build requests in the requests page of your repository.
Submitting a PR for the branch satisfies the PR rule for the test stage and would run the tests and give us this result.
Notice it runs only the tests stage. Hoorah!
Now let’s merge from the PR page. To do so, just click the merge button and follow through to approve. After we merge the branch to master, we will see this.
The Firebase deploy process for the new feature went smoothly!
And that’s all she wrote! We have our own CI/CD pipeline.
You can clone the project and try all this good-good on your own. Feel free to leave a comment if you have any issues. You can also contact me via twitter (@yonatankra) or ask on the Travis CI forum. While I’m no expert, I promise to help the best I can.
In this article, we learned that CI/CD is a time saving automation process that allows you to scale. Hence, it saves you a lot of time and money, and increases the productivity and value you can provide your end-users.
We also learned how to integrate a CI/CD process into a project on GitHub. You can add a lot of other steps to your CI/CD pipeline, for example, post-production tests and the rollback steps. We did not cover them in this brief intro tutorial, but I suggest implementing them just to get the hang of things.
Other steps could include limiting merge capabilities, adding different pipes for some scenarios, adding a QA branch if you are not yet sure of your pre- and post-production tests, and much more.
The bottom line is this: No matter which tool you choose, you can easily automate each process. By automating time consuming but simple processes, you can more confidently add contributors/team members to your project while speeding up the development process and providing more value to the end-users of your product (be it an open source library or an app).
Yonatan, @yonatankra, has been involved in diverse projects – from C/C++ through Matlab to PHP and javascript. Former CTO at Webiks. Currently he is a Software Architect at WalkMe.
Not a Travis CI user yet? Sign up for a free account!
Looking for something more bespoke for your builds? Try a free trial of Travis CI Enterprise.